Imagine tiny, wiggling sea monkeys – that’s what brine shrimp look like! These little crustaceans are super important for many fish and aquarium owners. But getting them to hatch can be tricky. Have you ever bought a brine shrimp hatchery and ended up with… well, not much? It’s frustrating when you want to feed your fish healthy food, but the hatching process is a puzzle.
Choosing the right brine shrimp hatchery can feel like a guessing game. Some don’t work well, some are messy, and others are just plain confusing. You want a hatchery that reliably gives you live brine shrimp for your aquarium. You don’t want to waste money or end up with a failed experiment. This guide is here to help you solve that problem.
By reading on, you’ll learn what makes a good brine shrimp hatchery. We’ll explore different types and what to look for. You’ll discover tips and tricks to ensure a successful hatch every time. Get ready to say goodbye to hatching headaches and hello to a thriving supply of live food for your aquatic friends!
Top Brine Shrimp Hatchery Recommendations

- 1. Fully equipped:Brine shrimp incubator provide a set of tools (20 pcs in total) for oxygen supply, hatching, and collection, feeding and storage of live brine shrimp fry after hatching, including: a brine shrimp eggs incubator , a air Pump, a acrylic rigid tube, 30 centimetre transparent Silicone hose,100 centimetre black Silicone hose, a air stone, a check valve, a regulating valve, a brine shrimp collection net, three brine shrimp straws , two automatic brine shrimp feeders, five storagers and a adjusting clip for brine shrimp
- 2. The installation methods of the brine shrimp hatcher machine provide a variety of options. The incubator for brine shrimp can be installed vertically inside or outside the glass of the fish tank, or the equipped The four-corner bracket installs the incubator on any platform outside the fish tank.
- 3. collect brine shrimp fry to realize automatic feeding: when hatching is completed, it can be collected and drained with a brine shrimp collection net, and then Use the equipped saltwater shrimp straw to suck the collected shrimp seedlings and feed them directly, or put the collected shrimp fry into the automatic feeding system which can be adsorbed in the fish tank, and the automatic feeding can be realized through the small hole at the bottom of the automatic brine shrimp feeder for fish
- 4. Excessive shrimp fry can be stored in the brine shrimp fry storage bottle equipped with this product for next use
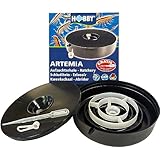
- 5. The shape of the brine shrimp hatcher is simple and beautiful, the hatching process is visible, and it is highly ornamental. It can clearly observe the whole process of shrimp eggs hatching into shrimp fry, and witness the miracle of life hatching.
- Easy to Use. Scroll through product images to find tutuorial video for hatching.
- No Aeration or Additional Equipment Needed
- Perfect For Small Volume Hatching Needs - Yields over 100,000 Baby Brine Shrimp in 24 Hours
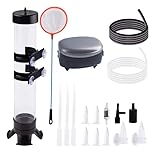
- The brine shrimp incubator contains:1pcs brine shrimp eggs incubator Hatchery,1pcs silver air pump with 1pcs black controller valve,1pcs check valve, 1pcs air stone,11.8 Inch long transparent aquarium tubing, 1 meter black airline ,one unit brine shrimp net colllector,two units automatic brine shrimp feeder for fish,three units Brine shrimp suction tube and six units Brine shrimp storage bottle
- There are two ways to install our brine shrimp hatcher machine.You can use the four suction cup of shrimp incubator to stick it to the tank glass inside or you wanna install it out of the tank glass then you can use the tripod to install out of the tank.
- The first way to provide oxygen to the brine shrimp incubator is to put the bubble stone in the incubator to provide oxygen. When the brine shrimp has hatched, open the trim valve at the bottom of the incubator to collect brine shrimp. Note that the direction of the inlet and outlet of the check valve must be installed correctly with the pipe, otherwise the air pump will not be able to discharge air.
- If you use the first way to install the brine shrimp incubator,Please remember to use a scissor to cut one piece small tubing like 0.5 Inch long in the product package to connect the gray acrylic tube and air stone and cut the other small tubing 0.5 Inch in the product package to connect the gray acrylic tube and lid.Please note that gray acrylic tube is not able to connect to air stone and lid directly,which need two small piece tubing to connect air stone and lid.
- The second way to provide oxygen to the brine shrimp from the bottom hole of the incubator. Please note the direction of the inlet and outlet of the check valve and the pipe must be installed correctly, otherwise the air pump will not be able to output air, and the trim valve needs to be opened. When the brine shrimp has hatched, first turn off the trim valve, then pull out the air pump tube from the trim valve, and then open the trim valve to start collecting brine shrimp
- No aeration required
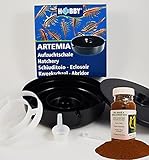
- Grade A (80% Hatch-Out) 1.75 oz ( 50 grams) Brine Shrimp Egg included with Purchase
- No siphoning required
- Ideal for small volume (1/2 gram) hatching needs
- Yields about 100,000 nauplii in 24 hours under ideal conditions
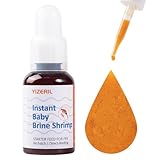
- No Hatching Required : Our instant baby brine shrimp fish food is ready to use straight out of the bottle, eliminating the need for time-consuming hatching processes. Simply use the dropper for easy feeding!
- Nutrient-Rich & High Protein : Packed with astaxanthin, vitamins, and other essential nutrients, this fry food for baby fish ensures your aquatic pets receive optimal nutrition for growth and vitality.
- Enhances Growth & Color : This premium fish fry food promotes healthy growth and vibrant coloration without polluting the water, ensuring a clean and safe environment for your small fish.
- Versatile Use: Perfect for various species such as guppies, bettas, peacock fish, corals, seahorses, and both saltwater and freshwater fish, making it an all-in-one solution for your aquarium needs.
- Triple Sterilization Process: We care about keeping the nutritional value intact while ensuring safety; our product undergoes a triple sterilization process and can be stored at room temperature for long-lasting freshness.

- Simple to use, you only need to prepare shrimp eggs, sea salt, a 1.5L mineral water bottle and an air pump. If you find a leak at the thread, that means your bottle thread does not match. Please replace the bottle such as EVAIN / Coca Cola / Fiji.
- Connect with an air pump, eggs require 24 hours to hatch. After hatching, shrimp can keep fresh for 48 hours in 4-7℃/39-45℉ environment. In winter, if the water temperature is low, you can use a small heater.
- The kit needs to be hung on the tank wall and is compatible with 3-10mm/0.12-0.39in thickness of the tank wall. Not compatible with rimmed and curved fish tanks.
- Enjoy DIY! Easy to assemble and easy to clean after use.
- Note: The brine shrimp egg and the bottle are not include in the package.

- Package include : 4 pcs ;
- Suitable Bottle : all kinds of soda bottle,as Cola bottle ;
- Suitable tubing : inside diameter 4mm/outside diameter 6mm ;
- USE : one side is air pumped and the other side is where the brine shrimp will be harvested from ;
- Item has O-ring inside lid and nipple connector,keep it work good .

- Updated Version: New upgraded 2.0 version brine shrimp eggs incubator, which can be used both outside and inside the aquarium.
- Supply Food: The brine shrimps that incubated by brine shrimp incubator supply the food for shrimp, fish and other seedlings.
- Better Material: Brine shrimp eggs incubator is made of premium acrylic material, strong and durable, odorless, not easy to break, has a long service life.
- Easy To Use: Connect the air pump to the air inlet at the bottom of the incubator, inject the water to the standard water level, add sea salt, and shrimp eggs, please pay attention to adjust the air volume.
- Incubation Temperature: Shrimp eggs can hatch in the range of 7-30°C The best incubation temperature is 23-30°C. Please pay attention to control the temperature.
Your Guide to a Thriving Brine Shrimp Hatchery
Are you looking to give your aquarium fish or even your pet reptiles a nutritious treat? Brine shrimp, also known as sea monkeys, are a fantastic live food source. A brine shrimp hatchery makes it easy to raise your own! This guide will help you choose the best one.
What to Look For in a Brine Shrimp Hatchery
Key Features to Consider
- Container Size: Hatcheries come in different sizes. A larger container means you can hatch more brine shrimp at once. Think about how many fish you have and how often they eat.
- Aeration System: Good aeration is crucial. It keeps the water moving and the baby brine shrimp (called nauplii) alive. Look for hatcheries with an air pump or a way to easily add one.
- Ease of Setup: You want a hatchery that’s simple to put together. Complex setups can be frustrating.
- Durability: Choose a hatchery made from sturdy materials that won’t break easily.
- Included Accessories: Some hatcheries come with starter kits, including brine shrimp eggs, salt, and even a small net. This is great for beginners.
Important Materials
Most brine shrimp hatcheries are made of clear plastic. This allows you to easily see your nauplii. The plastic should be food-grade and non-toxic. You’ll also need brine shrimp eggs, aquarium salt (not table salt!), and clean water. Some kits might include a small air pump and airline tubing.
Quality Matters: What Affects Hatchery Performance
Factors That Improve Quality
- Good Aeration: Constant, gentle bubbling keeps the nauplii from clumping together and ensures they get enough oxygen.
- Stable Temperature: Brine shrimp hatch best in warm water, usually between 75-80°F (24-27°C). A hatchery that helps maintain this temperature, or is easy to place near a heater, is a plus.
- Correct Salt Concentration: Using the right amount of aquarium salt is vital. Too little or too much salt will prevent the eggs from hatching.
- Clean Water: Using dechlorinated water or saltwater specifically prepared for aquariums is important.
Factors That Reduce Quality
- Poor Aeration: If the water is stagnant, nauplii can suffocate or clump together, making them hard to harvest.
- Temperature Fluctuations: Big changes in water temperature can harm the hatching process.
- Incorrect Salinity: Using the wrong type of salt or the wrong amount will kill the eggs.
- Contaminated Water: Tap water with chlorine can be harmful.
User Experience and Use Cases
Making it Work for You
Setting up a brine shrimp hatchery is usually a straightforward process. You’ll mix saltwater, add the eggs, and turn on the aeration. Within 24-48 hours, you should see tiny nauplii swimming around. Harvesting is typically done by siphoning the nauplii into a separate container or net.
Who Can Use a Brine Shrimp Hatchery?
- Aquarium Enthusiasts: This is the most common use. Fish keepers feed live brine shrimp to their bettas, guppies, goldfish, and many other species. It’s a great way to provide a varied and nutritious diet.
- Reptile Owners: Some smaller reptiles and amphibians, like certain geckos or frogs, will happily eat brine shrimp.
- Educational Purposes: Hatcheries are wonderful for teaching kids about the life cycle of aquatic creatures. Watching them hatch and grow is fascinating!
- Hobbyists: Anyone interested in a simple, rewarding aquatic project can enjoy raising brine shrimp.
A good brine shrimp hatchery is a small investment that provides a continuous supply of healthy, live food for your pets. It’s an engaging hobby that benefits your aquatic friends.
Frequently Asked Questions about Brine Shrimp Hatcheries
Q: What is a brine shrimp hatchery?
A: A brine shrimp hatchery is a container designed to make it easy to hatch brine shrimp eggs into live nauplii. These tiny creatures are a popular food for fish and other small aquatic animals.
Q: How long does it take for brine shrimp to hatch?
A: Brine shrimp eggs usually hatch within 24 to 48 hours, depending on the water temperature and the specific strain of eggs.
Q: What kind of salt do I need?
A: You need aquarium salt or marine salt. Do not use table salt, as it contains additives that can harm the brine shrimp.
Q: How much salt should I use?
A: The amount of salt varies depending on the specific brine shrimp eggs and hatchery instructions. Typically, it’s around 1 to 2 tablespoons of salt per liter of water.
Q: Do I need an air pump?
A: Yes, gentle aeration is essential. It keeps the eggs suspended and provides oxygen for the nauplii. Many hatcheries include a way to connect an air pump.
Q: Can I use tap water?
A: It’s best to use dechlorinated tap water or pre-mixed saltwater. Chlorine in tap water can kill the brine shrimp eggs and nauplii.
Q: How do I harvest the brine shrimp?
A: You can usually harvest them by siphoning them out with a small airline tube or using a fine-mesh net. The nauplii will often gather in the bottom or on one side of the hatchery.
Q: How long do hatched brine shrimp live?
A: Once hatched, the nauplii live for a few days. They are best fed to your fish within the first 48 hours of hatching.
Q: Can I hatch brine shrimp without a special hatchery?
A: While you can improvise, a dedicated hatchery makes the process much more efficient and successful by providing proper aeration and containment.
Q: What do brine shrimp eat?
A: The nauplii do not need to be fed for the first 12-24 hours after hatching. After that, they can be fed things like spirulina powder, yeast, or commercial brine shrimp food.